Forge welding is second only to material preparation in importance in the creation of quality pattern welded steel. It is not however, any form of magic.
Forge welding differs from more more modern welding techniques such as SMAW (Shielded Metal Arc Welding, commonly called “stick” welding), FCAW (Flux Core Arc Welding, commonly seen in gas-less wire feed welders), GMAW (Gas Metal Arc Welding, also called Metal Inert Gas or “MIG” welding), and GTAW (Gas Tungsten Arc Welding, also known as Tungsten Inert Gas or “TIG” welding) in that in forge welding, the metal to be joined never reaches a liquid sate during the welding process. Forge welding relies on heat and pressure to bring the atoms within adjacent pieces together in such a way that they intermingle across the weld boundary and form a single, solid piece of steel. This is known as a solid state diffusion bonding.
There is a lot of information out there about how to forge weld. Some of it good, but in my opinion, much of it leaves something to be desired. This is not to say that if you follow the advice given elsewhere you will meet with complete failure, but in my experience, some of it can leave you in a position to increase your chances of imperfections, inclusions, delaminations, etc. Below I will document my forge welding process. It’s not the only way to do it, it’s not the best way to do it. It is simply the way I do it. If you ask me about these processes in a year, they will likely be different. As experience is gained, things change. I will try to keep these pages up to date with my current processes though.
In this discussion on welding, I will be referring to welding in a gas forge as this is what I use and what I have great results with. This is not to say that excellent pattern welding cannot be done in a coal or charcoal fire, induction furnace, oil-fired forge, or using any other type of heating, those other methods are simply not the way I do it. I have forge welded in coal, and it is a very challenging skill to master. It is also very difficult to describe without being able to actually show somebody in person. As my goal is to produce consistent steel and to help you do the same, I will stick to describing the process with a gas forge.
Forge Atmosphere
The atmosphere inside of your forge plays a critical role in welding. The atmosphere inside the forge must be a reducing atmosphere. What this means is that there must be no free oxygen inside the forge as you heat your billet. Free oxygen in the forge will promote formation of scale on the steel which can lead to weld failures. With a gas forge, the best indicator of a reducing atmosphere is the “dragon’s breath” or flame coming from the front of the forge. You should be looking for 3-5″ of orange flame exiting the forge. What this indicates is that there is some unburnt fuel the has to exit the forge in order to find enough oxygen to burn. This means that the burn within the forge is consuming all available oxygen which leave no oxygen to cause oxidation and form scale on your steel that can prevent your weld from taking.
Flux
Flux serves two purposes in forge welding. It can dissolve scale that is already on your steel, and by sealing out oxygen, can keep more scale from forming. If you have followed my procedures for steel preparation, you will not need to count on flux to remove any scale. That means that flux will serve a single purpose in your welding. It will seal out oxygen.
There are a lot of opinions on what makes a good forge welding flux. This is one place where I firmly believe that simple is best. I mainly use 20 Mule Team Borax as my welding flux. It is widely available in grocery and drug stores, inexpensive, and a single box will last you a very long time using my methods. Certain materials, such as pure nickel, form oxides that flux won’t dissolve. If I’m using these types of materials, I’ll add about 30% boric acid to my Borax. Boric acid melts at a much lower temperature and will seal out oxygen at an earlier point as your billet heats. Boric acid also burns off at a lower temperature, so the Borax is still necessary. You can find boric acid as ant powder at your local hardware or dollar store. Just be sure that the package states that it is 100% boric acid.
You may have heard that you should add things to your flux such as flourspar, iron filings, sand, etc. There is no need for any of these. Flourspar is supposed to make the scale dissolving properties of flux more effective. Since we’ve already established that if we clean the surfaces first, we don’t need an agressive flux. Iron filing supposedly help the weld bond since the higher carbon content means that the iron filings will go into a liquid state at a lower temperature and promote welding, but anything that adds unwanted steels that could show up in the patterns of my billet later seem like a bad idea to me. Certain sands have been traditionally used as flux due to their silicate content, but we’ve got something better in Borax, so why mess with success?
You may have also heard that you must use “anhydrous borax” or you will run into trouble. Anhydrous borax is simply borax that has had any water cooked out of it. You can make it yourself by cooking your borax in an oven at 400-500F for an hour or so. I have used anhydrous Borax and it is nice because it doesn’t “puff up” in the forge as the water in the Borax burns off, but I’ve never had an issue with this and find that good old 20 Mule Team is a lot easier and less expensive to get. I’ve also found that the addition of some boric acid helps the Borax to “stick” to the billet better at a lower temperature and reduce the incidence of foaming Borax falling off of the billet.
Preheating
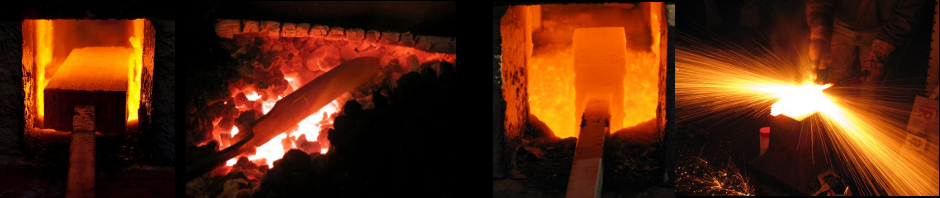
When I speak of “preheating” a billet, I am speaking of bringing the billet to a heat that is hot enough that flux will melt, but not so hot that scale can form on your steel. In order to get your straight Borax to melt and properly coat your billet, the steel must be at about 1000F. Translated to color, this is a dull red heat as seen in a darkened forge shop.
Place your billet in the forge, keeping it out of the direct path of your burner flame if at all possible. The cone of flame exiting your burner will not only create a hot spot , but it is also the one spot in your forge that will have free oxygen that may cause scale to form. At this point, let your billet begin to heat, occasionally rotating the billet in the forge to help it heat evenly. Pull the billet out every few minutes to get a look at how hot it is. When you begin to see some color in the steel, it’s time to flux.
Here is a place in the process where my methods differ from those of many other ‘smiths. A lot of people will tell you to just “flux the heck out of it”. I will not. I apply my flux by lightly sprinkling flux onto the hot steel like you would sprinkle flour onto a counter before kneading dough. You need a complete coating, but it does not need to be a heavy coating. A heavy coating of flux simply wastes flux, can damage the interior of your forge, and in a worst-case scenario can become trapped inside your billet and create a nasty inclusion. Initially, the flux will foam up a bit as any moisture in the flux steams out. It will then begin to melt into a clear, glassy coating on the billet. If it doesn’t, place the billet back into the forge an heat a bit more. You will be able to see the flux melting on the billet in the forge. When it begins to flow on the surface of the billet, you’ve hit the right temperature. Pull the billet back out and flux any surfaces of the billet where two layers that are to be welded come together. Generally I will flux the sides of my billets as well as the ends. There is no need to flux the top and bottom as they are single pieces of steel. Once your flux flows and forms a thin, glassy coating on the billet, you are ready to heat to welding temperature.
Heating the billet
This is a time to be patient. If you don’t wait until your billet is fully heated, your weld will not set. I took some advice from Delbert Ealy and I keep a book in the shop. I’ll sit down and read a chapter in my book, then check my billet. If it is not hot enough, I’ll sit down and read another chapter, etc. until my billet is properly heated. As your billet heats, occasionally rotate it in the forge to help it heat evenly. By sitting a reading a book, I not only avoid under heating my billet by being impatient, but I also get some good reading done!
Now that you have an excuse to enjoy a good book, you need to know what you’re looking for in the forge between chapters. The best description I have heard of what your billet should look like when it’s ready to weld is “like a melting stick of butter”. It should be at a very high orange to yellow color and you should be able to see the flux bubbling a bit and “dancing” on the surface of your billet. At this point, you should generally wait a bit longer to make certain that the center of the billet is also up to temperature. the extra wait time is determined by the size of your billet. Experience will help you to determine exactly when your billet is ready to weld.
It should be noted that you really shouldn’t stare into the forge. Your forge puts off ultraviolet as well as infrared light that can damage your eyes permanently. It’s basically the same thing as looking at an electric welding arc, but the damage happens much more slowly. Ideally, you should use protective glasses designed to filter out the UV and IR, but if you don’t have them you should only quickly glance into the forge to see your billet. I will hold my hand out to block my view of the forge and quickly move it aside and back to give me a quick glance into the forge.
Preparing to set the weld
Before I move to weld a billet, I always make sure I do a little preparation of my work area. Because heat and time are critical, I want to make certain that I know exactly what I’m going to do as well as where all my tools are. Look around your work area. Make sure nothing is between the forge and the anvil for you to trip over. Make sure the face of your anvil is clean of scale. I have a place for every tool that I need in preparation for a weld. My hammer always sits at the same spot on the anvil, facing the same way, waiting for me to pick it up and set a weld. Take a few minutes and step through your motions. Step away from the forge, turn to your anvil, pick up your hammer, and pretend to strike a blow on the anvil. Once this motion is practiced, you will have one less set of variables to slow you down and cause you to lose heat in your billet when you’re ready to weld.
Setting the weld
Once your billet is to a proper welding heat, it’s time to set your weld.
I will mention speed several times in this section, but I want to make certain that you understand that accuracy should not be compromised in the interest of speed. Practice your motions and make sure that you can strike well placed blows, quickly, and with the intended force. When you come from the forge to the anvil with your billet, you want to be able to grab your hammer on the way, lay the billet on the anvil, and set your weld without any unnecessary delay.
One very common mistake I see from ‘smiths setting forge weld is hitting too hard. Despite what you’ve been told, or what you might think, you do not need to smash the heck out of a billet to set a weld. As a matter of fact, hitting a billet really hard to set a weld can cause more harm than good. For one, you will throw more weld splatter a longer distance which creates an extra fire hazard (trust me when I say that setting something 10 feet from you on fire, while you’re performing a public demonstration, with fire fighters watching, is more than a little embarrassing 🙂 ). Additionally, if you strike your billet too hard, you can cause the layers to slip sideways rather than weld.
When setting a weld, your blows should move rapidly from the handle-end of your billet towards the far end of the billet and be struck with medium force. The way I like to think of it in order to limit how hard I strike the billet is that I’m “pressing” the layers together with my hammer, not “hitting” the billet.
After the first pass from end to end on your billet, flip the billet over and run another pass of welding blows across the other side. At this point, set down your hammer (I usually simply drop mine), pick up a wire brush, and brush the flux and scale from the sides of your billet. Then, moving quickly to avoid the formation of scale, re-flux your billet. The re-application of flux at this point is mostly for safety, just in case a weld did not set completely.
With experience, you will be able to tell as weld is set if it took or not. There is a distinct feel of a weld that has been properly set. It feels more like hitting something with a dead-blow hammer than what you are used to in forging. In addition, there is a distinct sound that a good weld makes. It’s more of a “thud” than the ordinary ring of forging. I have on many occasions heard somebody try to set a weld behind me and I’ have been able to tell them whether it set or not.
At this point, place your billet back into the forge and let it soak at a welding heat for 5 to 10 minutes. Adding this post-weld soak really does seem to have a positive effect on the quality of the weld. My working theory on this is that the high temperatures we use for welding cause a lot of grain colony growth in the steel. As these grain boundaries form across the weld interface, it strengthens the bond.
After the post-weld soak, I will make one more welding pass for safety and then go on to test my weld.
Testing your weld
I have two ways in which I test my welds. Both are pretty simple and can be performed one after the other.
First, after soaking the weld in the forge and making my second welding pass of hammer blows, I will rotate the billet 90 degrees so it is sitting on its side, and run a pass of firm blows on the side of the billet. If you have a weak weld, this may very well pop it open.
If make it through the first test, I will hold the billet outside of the forge for a minute and let it begin to cool. As it cools, look at all sides of the billet and see if any individual piece of the billet cools at a different rate from the rest of the billet. If you see cooling at differential rates, odds are the demarcation between those rates of cooling is a bad weld.
Fixing a bad weld
Bad welds happen. No matter how much preparation you do or how careful you are, sometimes a weld will not stick the first time. You can also open up a weld by agressive forging, or forging too cold after welding. Don’t worry, all is not lost! As soon as you notice that a weld has opened, wire brush the area and flux it. Do not pass go, do not collect $200, go straight to cleaning and fluxing. Your goal here is to prevent any scale from forming inside of the failed weld. The flux will help a bit here as well. Once you have fluxed, go back into the forge and raise that area to a welding heat, and re-set the weld.
Brilliant explanation. Thank ou for providing this. I can’t wait to try your methods.
If you twist the billet, should the weld be strong enough to stick?
Assuming that your welds are good, they should survive twisting just fine. There are however some reccomendations here. One, make sure that after you set the last weld before the twisting that you reduce the steel in cross section by at least 50%. So, for example, if you want to twist a 1″ bar, I’d make sure that the last weld happens while the billet is 2″ thick or thicker. The post-weld forging helps to ensure that the weld is good (you have some time to catch a bad weld and save it), and thermal cycling during forging gives the grain colonies at the weld interface an opportunity to sort of “knit” themselves across the weld boundary and strengthen the weld.
Im thinking of trying a combination of high carbon, spring steel and boron steel. do you think these will weld?
Douglas,
Do you have the specific alloys you plan to work with? Terms like “spring steel” and “high carbon steel” aren’t terribly specific, and can be confusing. For example, 1095 is a simple, high carbon steel. One of the most popular uses for it is in springs. Is it “high carbon” steel? Yes it is since the carbon content of 0.95% is above the 0.60% or so that’s generally considered the cutoff for “high carbon”. Is it “spring” steel? Sure it is! Spring are an application though and so the term describes nothing about the content of the steel, just the use.
That said, most simple high carbon steel will weld up just fine. Some steels used in spring applications may have alloying elements that can be challenging to weld for a beginner, but I’ve found that with proper surface preparation, many things are possible.
I’m not at all familiar with borated steels. If you can point me to a specific alloy, I can take a look at the composition and give you an opinion.
Of course, the number one concern in selection of steels for pattern welding should be the compatibility of heat treatments for the steels. Have you looked at the heat treatment data for the steels in question? Second should be whether the steels in use will meet the usage requirements of the finished product. this is the point to look at your intended application and see what the needs really are.
If you can give me an idea of what steels you’re using and what your intended use and results are, I’d be happy to work with you to figure out the right combination.
-d
Well im afraid im dealing with scrap, so i cant really be sure of the actual specifications. other than some old rasps (some kind of high carbon steel), the leaf spring off a land rover and some bits cut off a fork lift fork (which is apparently boron steel) I have basically chosen what i had laying around, that i thought would make a hard shell. based on the research i had done, too be wrapped around some wrought iron to form the soft core of a blade, loosely based on the traditional japanese method of making samurai swords. But alot of what im doing is guessing and im only a beginer.
While researching materials to used i found:
“Because leaf springs are made of relatively high quality steel, they are a favorite material for blacksmiths. In countries such as Nepal, Bangladesh and Pakistan where traditional blacksmiths still produce a large amount of the country’s tools, leaf springs from scrapped cars are frequently used to make knives”
Also i think (though i may be wrong) that they have a relativley high nickel content, which would look good.
As for the boron steel i found “Boron is useful as an alloying element in many materials as an alloying element in the steel because of its effect on hardenability enhancement.
Id appreciate any help or advice you could give.
I will say once at the beginning here that I will always stick by my recommendation of using known steel. There are a few reasons I say this. First, you’ll be working with known material and so are less likely to run into things that don’t want to weld, won’t heat treat properly, won’t contrast well, etc. Second, your time is the most expensive part of this type of work. How does $20 spent on good steel for a billet compare to 20-30 wasted hours when something doesn’t turn out right? Also, new steel can significantly cut down on prep time (if ordered from the right suppliers) and actually save you time.
But enough of that! I don’t want to discourage you, so let’s talk about what you have to work with.
Rasps are particularly risky. Files are very often made of decent steel (New Nicholson files are made from W-1. Nicholson has verified this.). Rasps on the other hand are very often case hardened mild steel because they are designed for cutting softer materials and don’t need to be fully hardened. If you plan to use a rasp in something that is anything more than decorative, test a piece of each rasp to make sure it will properly harden before you begin. I have a small pile of rasps in the shop that wouldn’t harden no matter what I did to them. I gave up on rasps after that. If you find you have good ones, grind off all of the teeth and make a nice, flat surface to weld to. You’ll likely end up with a medium grey color from any high quality rasps you find after etching.
Leaf springs can make great knives if properly handled and heat treated. Unfortunately, they can be a bit of a pain in pattern welding. Assuming the steel most popularly attributed to leaf springs (5160) is what you have (though they can vary wildly nowadays) you will have .70-.90% Chromium to contend with in your welding. the Chromium oxides that form on the surface of clean Chromium bearing steel will prevent proper welding, and no flux I know of will dissolve them. So, you must be extra certain that you have a fully clean, flat surface that mates tightly with its neighbor. After that, you have to get flux melted on it as early as possible to keep the oxygen away from the Chromium. If it’s hit a medium red, it may already be too late. In my experience welding up 4140 (0.80-1.10% Cr) it did weld just fine when cared for, but it had to be worked carefully to avoid delamination. Once a crack between layers appears, you have to be VERY quick to save it. Also, 5160 will etch a medium grey that in my experience end up looking kind of “muddy”.
The boron steel I’ve got nothing on to be honest. I’ve never worked with it. I’d need to have an alloy name or some chemistry to give you an idea of what to expect.
If you want to use found steel to practice technique, I say go for it, but be prepared for the results. What you’re missing in the materials described thus far is a “shiny” component. We usually use a Nickel bearing steel for this as the Ni will resist the etching and formation of surface oxides that give the simple steel their grey to black coloring. A combination that has worked very well over the years is banding strap (the wider industrial kind) and bandsaw blade (again, wider is better, and grind off any teeth first for several reasons…). Industrial banding strap is very close to 1095 and you can weld it without cleaning off the paint. Check with your local welding/fab shop or anyplace that gets a lot of palletized freight. They will usually give it to you. Good bandsaw steel will almost always have nickel for toughness. Beware of the teeth though. If it’s a bi-metal or carbide tipped blade, the teeth will never weld and will just ruin your workpiece. Remove them. Also, make sure to run a bead of weld down the side of these billets or they’ll puff up like a balloon in the forge and trap all kinds of crud between the layers.
I’ll make you a deal. Privately email me (deker@dekerknives.com) and I’ll send you a small billet’s worth of good, known steel to try. If it’s not easier and faster for you to work than found steel, I send you a bar of pattern weld to use for free. 😉
So I just made my first pattern welded steel billet, right now it only has seven layers both out of band saw steel, one is from a old wood mill band saw and the other is from a heavy duty metal cutting band saw blade. I welded it and have forged it out quite a bit afterward in an attempt to be able to cut it and re weld it to get more layers. I don’t know of the alloys of the steels but I thought that logically from the two different applications of the blades there would be enough differentiation between the layers. and I cut it and I have not seen any lines to show a crack between layers. but if I sand against the grain I can see very light grey lines from the different steels but it still looks like one piece, and wont separate. Do you think this means it was welded properly? Also I want to try to add more layers I was thinking about adding steel used in a semi-truck leaf spring, all I know for sure is that it hardens really well in water and I haven’t tried it in oil but I don’t know as this is my first time, do you think this might be a good idea to try?
I found all this so informative and perfect for a beginner. Thanks so much for sharing this.